A few weeks ago I was on my way out of the bridge club around 12:30pm after a morning commitment there. A couple of afternoon players were caught in some wicked traffic, so I stuck around to fill in for a board or two until they arrived.
I end up with Tom Snyder (also filling in) and Janet Case as my opponents for the first board of the session. Having no agreements whatsoever with my partner, I was hoping for a ho-hum hand, without much headache. Of course, the bridge Gods were not amenable, and I sort my cards into the following hand:
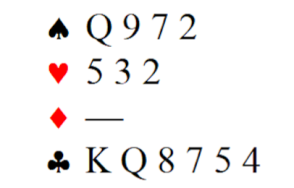
To my surprise, my partner (North) opens 1♣ in first chair! Tom Synder on my right overcalls 1♦. I decide to start with 1♠, unsure what I’d do later. Janet Case raises to 2♦ on my left, and partner surprises me again with a 2♠ bid! Tom Terrific competes to 3♦ on my right, and I decided that my hand is worth bidding 3♠, but no more. I buy the contract there. To recap:

Janet leads the ♦4 on my left and I am left with this pair of hands:

I sit for a minute, trying to wade through the mud and figure out the right line of play. I ultimately decide to ruff dummy’s diamonds in my hand. The alternative would be to pull trumps and try to set up my clubs, but it’s unlikely I’ll have an entry to the club suit after all of that is said and done. So, I ruff the first diamond in hand, play a heart to dummy, and ruff another diamond. I play another heart to dummy, and ruff that last pesky diamond.
I reach the following position:

Now seems like a good time to pull trumps, with dummy looking better and better. So, I play the ♠Q out of my hand, West plays small, I play small from dummy, and East wins the ♠A. He now plays the ♣J, I cover, and West wins the ♣A. She now plays the ♥J, which I attempt to win with the ♥Q in dummy, but to my dismay, East ruffs it! He now plays a club, and I win that in my hand. Here is the position:

I have lost 3 tricks (♣A, ♠A, and small spade used to ruff) and the opponents are still getting a heart. The opponents have 2 more trumps. I cannot afford to lose any spade tricks, but I am unfortunately stuck in my hand, and have to get to dummy. I play a small ♣ and West plays the ♣T – Which spade do you play?
We have to get to dummy here to collect the last of the trumps and lose only the heart to make our contract. Unfortunately, East is out of clubs (They split 6-3-2-2 around the table, so dummy and East are both out) and may be overruffing if I ruff small in dummy. However, if East has no more spades, it means West has ♠Tx remaining and I need to ruff small in dummy on this trick.
SO – let’s do some counting. East started with 2♣ and 2♥ – that much we KNOW. The opponents started with 10 diamonds, but only bid them to the 3-level. From the auction, they’re splitting 6-4 or 7-3. I thought it unlikely that East had 7 diamonds, heard his partner raise his suit, but then sold out to our contract without competing to the 4-level (perhaps citing the Law of Total Tricks). So, I decided East started with 6 diamonds, giving him 3♠, 2♥, 6♦, and 2♣. He has already taken the ♠A and ruffed the heart with a small trump, so he has one trump remaining, and West has one trump remaining. See the presumed position here – I am in my hand and play a club towards dummy:
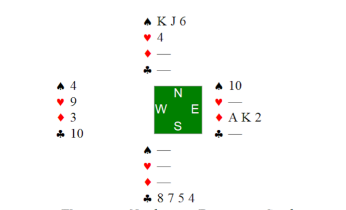
I confidently ruff the club HIGH in dummy ( in case Tom’s remaining spade is the ♠T) and call for the ♠K, “knowing” that the two remaining spades are splitting 1-1, and I will only lose the heart trick to make my contract.
Much to my dismay, Tom PITCHES A DIAMOND on the ♠K, meaning Janet is left with ♠Tx and is scoring the last two tricks with ♠T and ♥9! What is this? My hard work, my careful planning and calculations, what went wrong here?
It turns out Tom indeed started with 7 diamonds, and his starting shape was 2-2-7-2. All I had to do was ruff the club SMALL in dummy (Tom had no more spades with which to overruff), play my top two spades, and concede the ♥ as the defense’s 4th trick.
This was the ACTUAL final position:

All in all, counting the opponents’ shapes is one of the HARDEST parts of both declaring and defending, but is (in my opinion) the absolute MOST reliable way to improve your game. This type of counting can give you all sorts of information, like which way to finesse for a Queen (or Jack), when to ruff high/low, or even when to pull trumps or not. It can take a lot of frustrating practice, and requires paying careful attention to your opponents’ bids and cards. And, sometimes you undergo an entire operation, figure out how to play according to that information, but the patient still dies, because of a reasonable – but faulty – assumption we had to make.
Such is life, and such is bridge! Luckily I only had to fill in for one more hand before I could slink out of the club with my tail between my legs and drown my woes in a comforting PB&J sandwich for lunch.
