There is plenty of talk among bridge players of “making a plan” when declaring. That is, deciding what you need to do to take the most tricks, and then carrying it out and re-evaluating if something doesn’t go quite as planned.
Well, let’s take it a step further: beyond simply making a plan, let’s talk about making a GOOD plan — a plan which has the best possible chance of working! Allow me to explain using a declarer play problem. See the hands below:
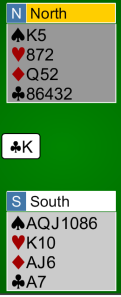
South reaches 4♠ with no opposition bidding, and West leads a particularly unhelpful club honor. I tend to count losers in suit contracts, so here we have a possible 2 hearts, 1 diamond, and 1 club to lose — one trick too many. What is the best plan to avoid the loss of four tricks? Well, we have two possible finesses in the red suits, and hope that the ♥A and ♦K are on our right, with East. With that in mind, make a plan for tricks 1, 2, 3, and 4.
When you are ready, click on the link below.
So, we need to avoid one of our potential losers to make our contract. We can’t ever avoid the club loser, so that’s off the table. It comes down to finesses in both red suits. HOWEVER, take note that we have only one entry to dummy, so we can ONLY finesse in one suit or the other. So which one?
Let’s look at the diamond suit in isolation. To finesse the ♦K, we can either lead the ♦Q from dummy, or play a small one to the ♦J. However, even if the finesse works, we STILL have a diamond loser. If we lead the Q and your left-hand opponent covers, we will lose to the ♦10 eventually. If we play low to the ♦J and it wins, we still have to lose to the ♦K (unless East started with ♦Kx which is a very specific, rare holding).
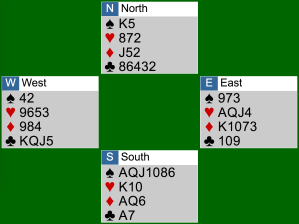
So, while the diamond finesse looks mighty juicy with our one entry to dummy in spades, it is really an illusion — since you do not have the ♦10, there is no way to avoid the loss of the diamond trick (absent the very unlikely ♦Kx in the East hand). Your single dummy entry is better spent leading towards the ♥K, where we can absolutely avoid a loser if the ♥A is onside in the East hand. Thus, at Trick 1, win the ♣A. Then, to avoid any funny business in trumps, cash the ♠A in hand. Play a small ♠ to dummy’s ♠K at Trick 3. Lead a heart towards the King at Trick 4. If it loses to Ace, you shrug and go down 1, feeling confident that you made the right play. If it wins, pull the last trump(s) and concede 1♣, 1♦, and 1♥ for making 4!
See the full deal below:
The following honor positions come up frequently are important to remember:
1. With AQx opposite Jxx, or something similar, there is little point in finessing because proper defense will almost always hold you to 2 tricks in suit.
2. With AQx opposite J10x, or the equivalent, you will be able to avoid any losers in the suit if the King is onside. The presence or absence of the 10 makes all the difference in the world.
Plans are nice, but even nicer when they have a chance of working!
— Julie Arbit

Declarer can maximize his chances by ducking the K of clubs, especially if his RHO plays low on the first trick (or opponents are not watching each other’s signals!).
If LHO has only KQx(xx) in clubs, he may be worried that leading clubs again will give you a trick via the Bath Coup when Declarer holds both the A and J of clubs. If LHO switches to a red suit, you may win your 10th trick right away. Very little risk to ducking that first club, and giving opponents the chance to err and help you.
Bob
LikeLike
A cogent observation which would be more cogent here but for the fact that the dummy has 5 clubs. The only way declarer can execute a bath coup is if he started with AJx of clubs. But in that case, East has a singleton. West can safely underlead the club queen and give his partner a ruff. That sets the contract as South still has another club loser and must lose the heart Ace.
Even if East does not have a singleton, with South playing a low club on the 1st trick, East must have started with Jx or Ax. West can always safely underlead the club queen. While it does not get the defense another trick, it is an entirely safe exit on this particular lie of the cards.
LikeLike
Declarer does not know that LHO has 4 clubs–he could well have 3. Unless RHO has a singleton club, Declarer risks nothing by ducking the K and hoping opponents may give him an undeserved trick.
Bob
LikeLike
But LHO also might have started with 5 clubs in which the 2nd club gets ruffed! Ugly!
LikeLike
Agree, that would be very sad, though the probability that the RHO has a singleton is low (7.5%), and very unlikely LHO would lead a singleton K. The potential gain may outweigh the risk??
LikeLike